Military Aircraft Detection with YOLOv8
This project aims to develop a computer vision system to detect and identify military aircraft. The project is developed on top of open source model Ultralytics YOLOv8 and publicly accesible military aircraft detection dataset from Kaggle.
Project Phases
Introduction
Since the dawn of civilization, warfare has been the primary driver of technological advancement, a reality that remains clear today. There is nothing shocking about this phenomenon, as the very wish for peace and prosperity has led us down this path. This paradox echoes the ancient Roman adage:
Si vis pacem, para bellum - If you want peace, prepare for war.
This paradox grounds the development of many advanced military technologies, including the focus of this project: aircraft detection systems. These systems are not theoretical concepts, but widely used tools in real-world scenarios, with key applications that include:
- Automated Target Recognition (ATR): In a combat scenario where speed is critical, ATR systems integrated into fighter jets, bombers, and drones autonomously detect and classify enemy aircraft with a high degree of accuracy, reducing the cognitive load on military personnel and speeding up the process.
- Intelligence, Surveillance, and Reconnaissance (ISR): Computer vision systems are used to automate the analysis of vast amounts of visual data collected from satellites, high-altitude aircraft, and surveillance drones. For this specific category, change detection is the most popular application.
- Air Defense Systems: Ground-based and naval air defense systems use a combination of radar, infrared sensors, and computer vision to detect, track, and identify incoming aerial threats. Computer vision provides an additional layer of verification, helping to distinguish between enemy aircraft, civilian planes, and even flocks of birds, thereby reducing the risk of friendly fire or false alarms.
- Autonomous Navigation and Threat Avoidance: Military drones, especially those designed for stealth or operations in GPS-denied environments, rely on computer vision to navigate and identify potential threats.
These are only a few of the real-world applications of aircraft detection and identification systems. As the stakes of war rise, we will likely see even wider applications and advancements more rapid than ever in such systems. For any sovereign power, innovation in this field is a strategic necessity.
In this project article, you will witness the entire process of developing such systems: from data gathering to training to optimization and actual usage.
Dataset
1. Desired Dataset
To train an AI model to detect and identify military aircraft, the desired dataset needs to have the following features:
- High number of images and instances
- High number of military aircraft types
- High variance in image size & quality
- High variance in angle & aircraft positioning
- Diverse backgrounds
- Annotations (YOLO format is a plus)
2. Candidate Datasets
I utilized the following tools during this module: Kaggle, Google Datasets, Gemini Deep Research, and Perplexity Research. Based on the features determined above, my research identified several datasets prominent in the field of computer vision for aircraft detection & identification:
- DOTA (Dataset for Object deTection in Aerial images): A massive-scale dataset for general object detection in overhead aerial images.
- RarePlanes: A unique hybrid dataset combining real satellite imagery with a vast amount of synthetic data, focusing on fine-grained attribute recognition for each aircraft type.
- MAR20 (Military Aircraft Recognition 20): A specialized benchmark for military aircraft in remote sensing images, notable for its high-precision Oriented Bounding Box (OBB) annotations.
- ADCOS (Aircraft Detection in Complex Optical Scene): A modern dataset designed to test model robustness using challenging satellite imagery with clutter, shadows, and occlusion.
- HRPlanesv2: A dataset focused on aircraft detection in very-high-resolution (VHR) satellite imagery sourced from Google Earth.
3. Dataset Evaluation
Referring back to the real-world applications of aircraft detection and identification systems, it is crucial to recognize the limitations on the public in this field:
As civilians, we cannot possess automated targeting systems for combat scenarios or air defense target verification systems. Almost every country has laws forcing these limitations. Specifically, data from such sensitive military applications is usually classified. As a result, the primary public-facing application for these technologies is change detection - which is widely used by journalists and open source intelligence researchers.
Consequently, the majority of the datasets that are available to the public - like the ones above - are focused on change detection use cases, which require overhead imagery. This represents a major hurdle in developing a military aircraft detection & identification system.
Fortunately, I was able to find a dataset that practically suits all our needs:
4. Military Aircraft Detection Dataset
This dataset:
- Is publicly available on Kaggle,
- Consists of 85 types of aircraft,
- Contains ~20k images,
- Is completely annotated,
- Has high variance in image size and quality,
- Has high variance in angle and background.
With all these features, it checks all the boxes for our dataset requirements. However, in its current condition, the dataset still requires a serious pre-processing due to huge class imbalance, label incompatibility with YOLO, and structure.
Through further research, I found a readily pre-processed version of this dataset on Kaggle. This version:
- Consists of 43 classes,
- Contains ~12k images,
- Eliminates the minor classes,
- Combines classes that represent different versions of the same aircraft type,
- Converts labels to YOLO-compatible format
- Has a YOLO-compatible structure.
Exploratory Data Analysis
Analysis
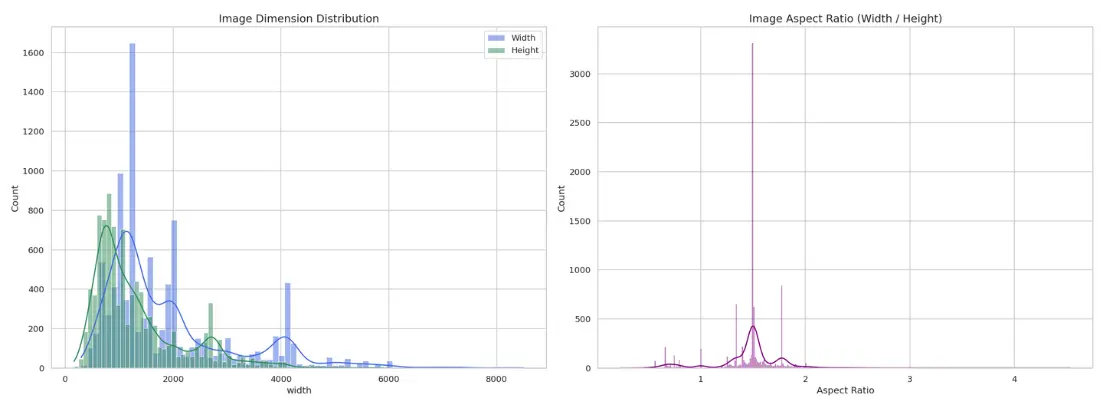
- Image dimensions (width and height) vary significantly, with most images clustered between 500-2000 pixels but with a long tail of larger images.
- The majority of images are landscape-oriented, but notable variance is present.

- Most images contain only 1 object. Signaling low variance in this aspect.
- Most bounding boxes are centered.
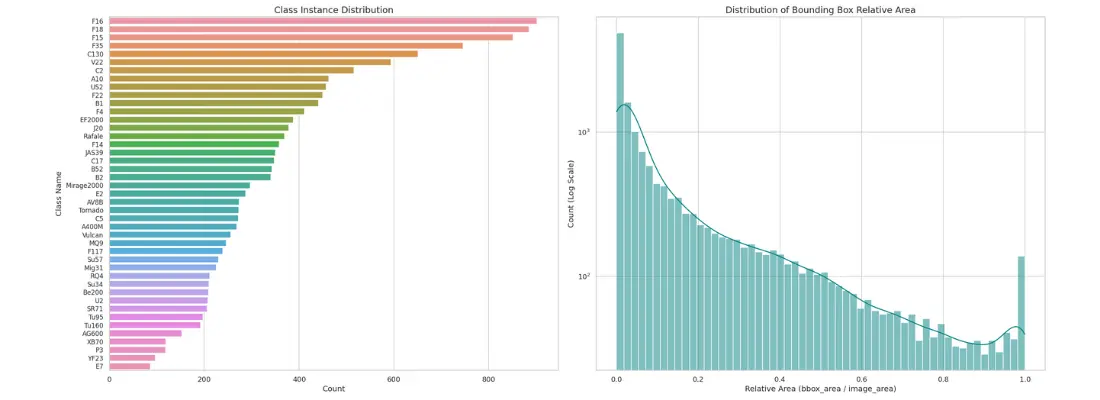
- Despite the pre-processing, the imbalance across classes is clear.
- Bounding box area / Image area ratio indicates that most objects are small to medium sized.
Conclusions
- The average image size of this dataset is clearly above the standard 640. A larger size would be more suitable during training.
- The variance in image size and orientation requires careful handling and unification.
- A model trained on this dataset is expected to be prone to positioning bias.
- Class imbalance implies that metrics like mean average precision (mAP) should be used to track performance instead of regular accuracy metrics.
- It is known that models struggle to identify small sized objects. However, with large samples in this dataset, promising outcomes are expected if appropriate methods are used.
Model Selection & Tuning
Considering the insights about the dataset from the EDA, YOLOv8 serves as the perfect model to use. Specifically:
- the data loader of the model handles various image sizes automatically,
- its default mosaic augmentation fixes positional bias and low object density problems,
- the built-in path aggregation network neck resolves the difficulty of model training on small sized object samples.
I used Kaggle Notebooks with P-100 GPU for training. I initially began training with YOLOV8l. However, each epoch took 25+ minutes. Considering the limited cloud notebook resources, I decided to downgrade to YOLOv8m. This decision sped up the process while maintaining much of the model capabilities.
I ran the native tuner function from ultralytics library to optimize hyperparameters.
model.tune(
    data='data.yaml',
    # iterations=5, # do not forget this parameter
    epochs=15, # try 5-10 if iterations is active
    imgsz=800,
    batch=4, # set -1 for automatic batch size
    workers=4, # set according to available CPU cores
    patience=3
)- I initially set the
imgszparameter to 1280. But this prolonged the time per epoch to over 25 minutes, so I had to downsize to 800. - I also set the
batchsize to auto, however the session kept crashing under heavy load - likely because it started with high values. Therefore, I set it to 4.
Tuner Results: mAP50 vs mAP50-95
While running the tuner, I forgot to set iterations parameter. Thus, the session timed out after 3.5 iterations (53 epochs) due to Kaggle’s 12-hour limit.
However, the tuner had achieved 75.7% mAP50(B) score in its best iteration.
Training
With the best_hyperparameters.yaml file that I got from the tuner, I ran the first training session on YOLOv8m for 35 epochs.
hyp_path = '/kaggle/input/hyperparameters/best_hyperparameters.yaml'
with open(hyp_path, 'r') as f:
    best_params = yaml.safe_load(f)

model = YOLO('yolov8m.pt')

print("\n--- Starting training ---")
results = model.train(
    data='data.yaml',
    epochs=35,
    imgsz=800,
    patience=5,
    batch=-1,
    workers=4,
    optimizer='SGD',
    **best_params
)
I used Stochastic Gradient Descent optimizer for memory efficiency and a possibly better final outcome than Adam.
This training run achieved 77% mAP50(B) score. Lower than what I expected, considering the tuner achieved almost the same result with only 15 epochs.
Training Session 1: mAP50 vs mAP50-95
Seeing that I couldn’t pass the 80% accuracy threshold, I decided to try another run. However, I had run out of GPU session time in Kaggle. So, I decided to use Google Colab. The problem with Colab is that it doesn’t have a Save & Run All option like Kaggle. This causes a runtime disconnection problem while running time-consuming operations. To solve this, I wrote the following script:
display(Javascript('''
function ClickConnect(){
    console.log("Keeping session alive...");
    var connectButton = document.querySelector("colab-toolbar-button#connect");
    if(connectButton != null){
        connectButton.click();
    }
}
setInterval(ClickConnect, 300000);
console.log("Anti-disconnect activated!");
'''))
I initially used Kaggle library to download and use the dataset from Colab Notebook, but the session kept crashing. Therefore, I switched to wget:
!wget -O /content/dataset.zip \
"https://www.kaggle.com/api/v1/datasets/download/rookieengg/military-aircraft-detection-dataset-yolo-format" \
  --header=f"Authorization: Bearer <KAGGLE_USER_NAME>:<KAGGLE_API_KEY>" \
  --progress=bar:force:noscroll
This worked perfectly. Colab offers about 4 hours of GPU usage time per session. Hence, I ran the training session with only 15 epochs:
results = model.train(
    data='data.yaml',
    epochs=15,
    imgsz=800,
    patience=5,
    batch=-1,
    workers=2, # Colab offers 2 CPU cores
    freeze=10
)
In this secondary training run, I did not use the hyperparameters from tuning session to avoid high learning rates and hyperparameters that do not suit additional training. I let YOLO’s built-in functionality to set these hyperparameters. Additionally, I froze the initial 10 layers of the model to preserve the powerful, generic features it learned and make the new training process faster and less prone to errors.
Training Session 2: mAP50 vs mAP50-95
Unfortunately, despite all effort to optimize the second run, the model only improved by 1%. After countless trials, continuous learning, 37 hours of total training time, and persistent work across 4 days, the final model reached 78.3% accuracy on mAP50(B) and 72% accuracy on mAP50-95(B) metric.
Web App Development
The web application is built using Streamlit, providing an intuitive interface for real-time aircraft detection in both images and videos. The app architecture prioritizes security, performance, and user experience through several key design decisions.
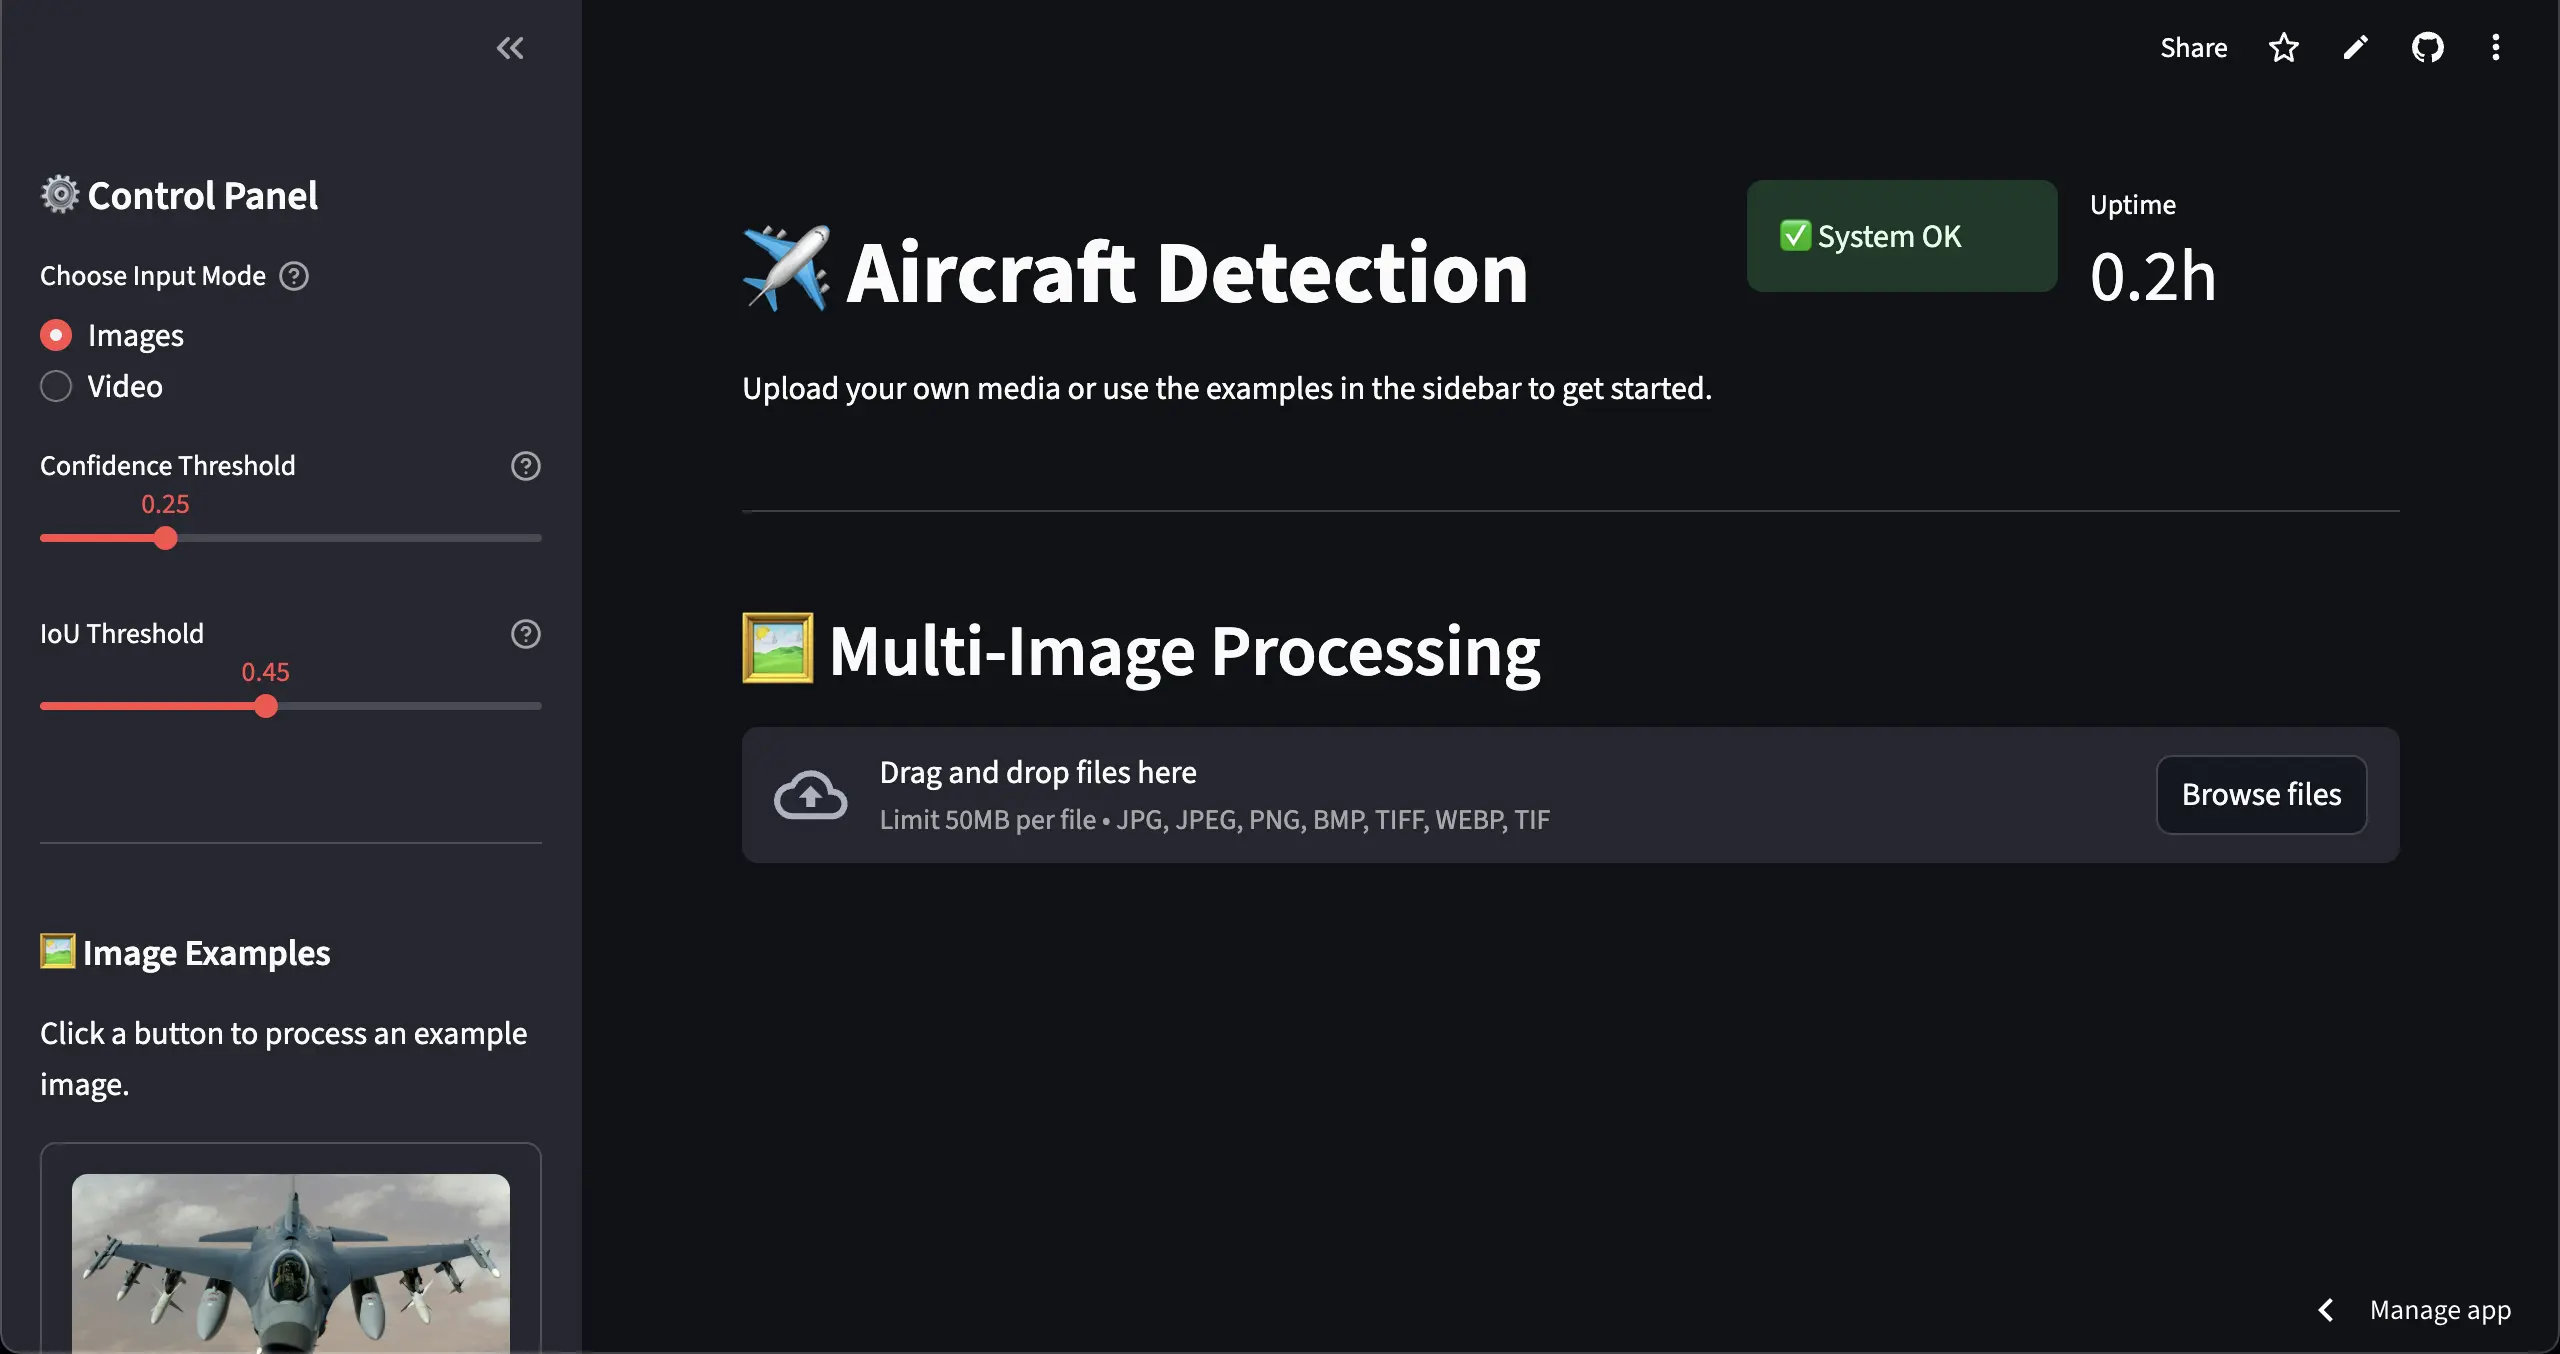
Design & User Interface
I designed the application with a modern dark theme to make it easy on the eyes for extended use. To keep things organized, I divided the interface into two main parts: a collapsible sidebar for all the controls and examples, and a main content area to display the results.
The left sidebar contains an intuitive control panel with clearly labeled sections - input mode selection, adjustable detection thresholds, and contextual examples that change based on the selected mode. Visual feedback is provided throughout, with system health indicators, rate limiting status, and real-time processing metrics prominently displayed.
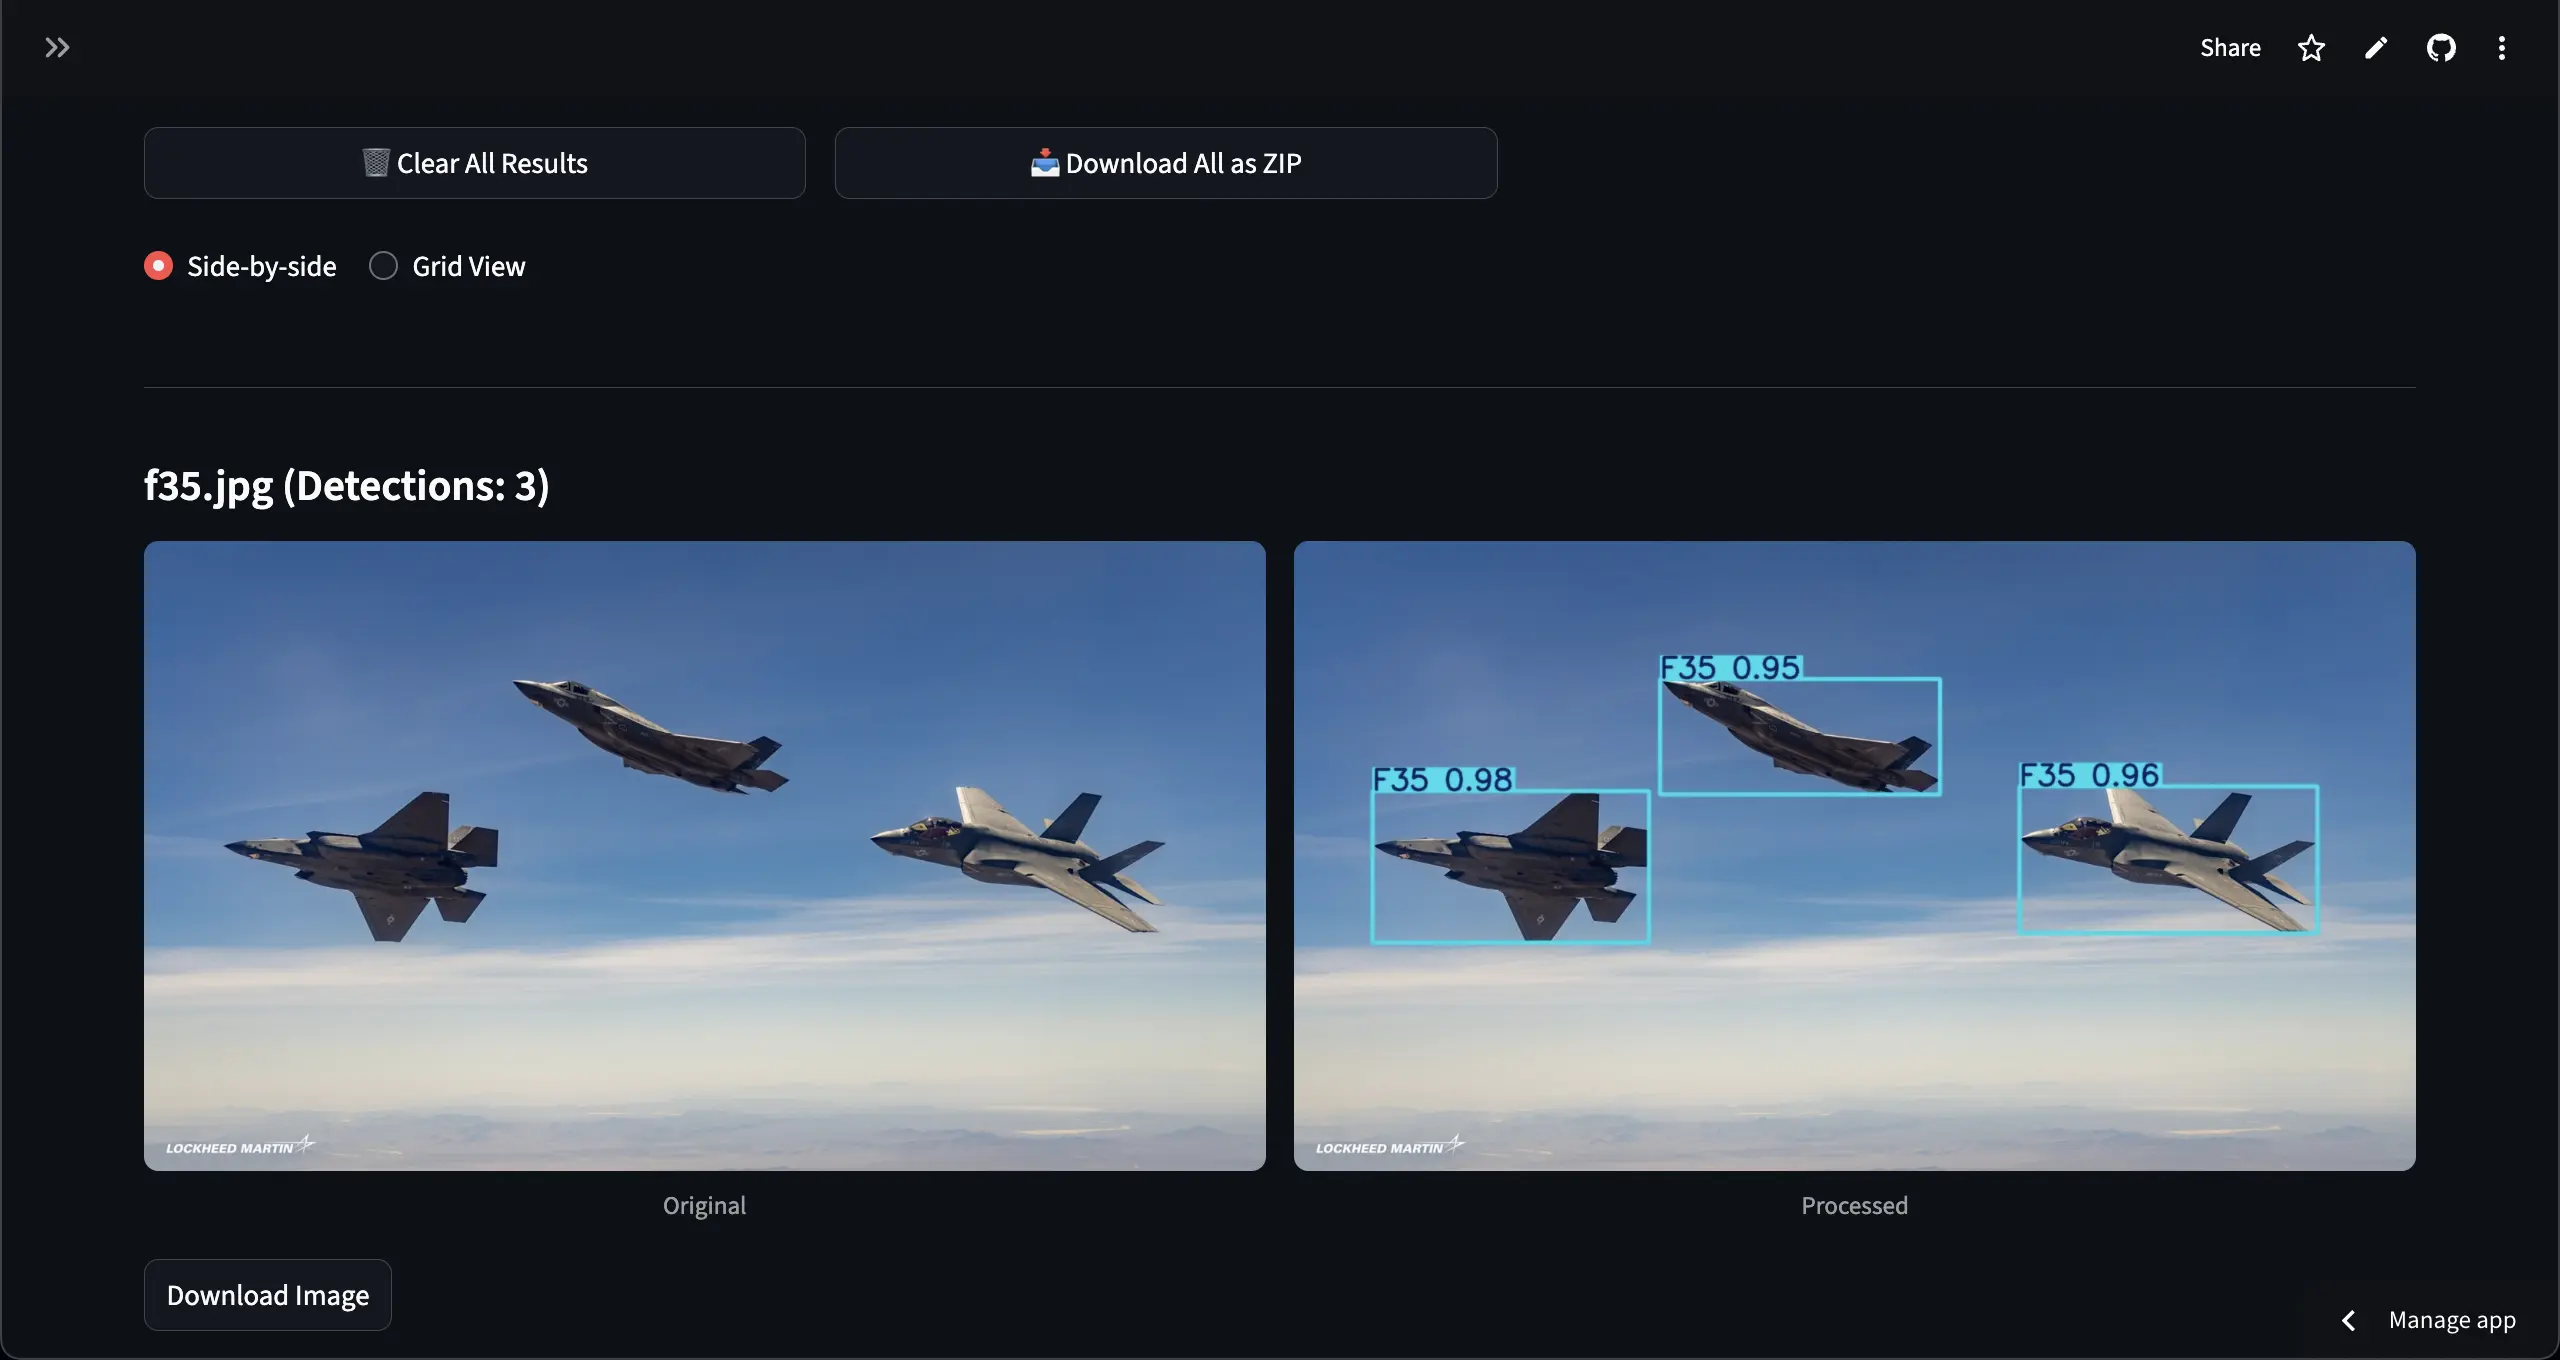
The main interface adapts seamlessly between image and video modes, with the results section dynamically reorganizing to show relevant metrics. For images, users can switch between side-by-side comparison and grid views, while video processing provides split-screen preview with the original on the left and real-time detection overlay on the right.
Core Architecture
I built the app with a modular structure to keep the code clean and easy to maintain. I put all the user interface logic in app.py and the backend processing functions—like image handling and model inference—in utils.py. The app supports dual processing modes - multi-image batch processing and video analysis - each optimized for their specific use cases.
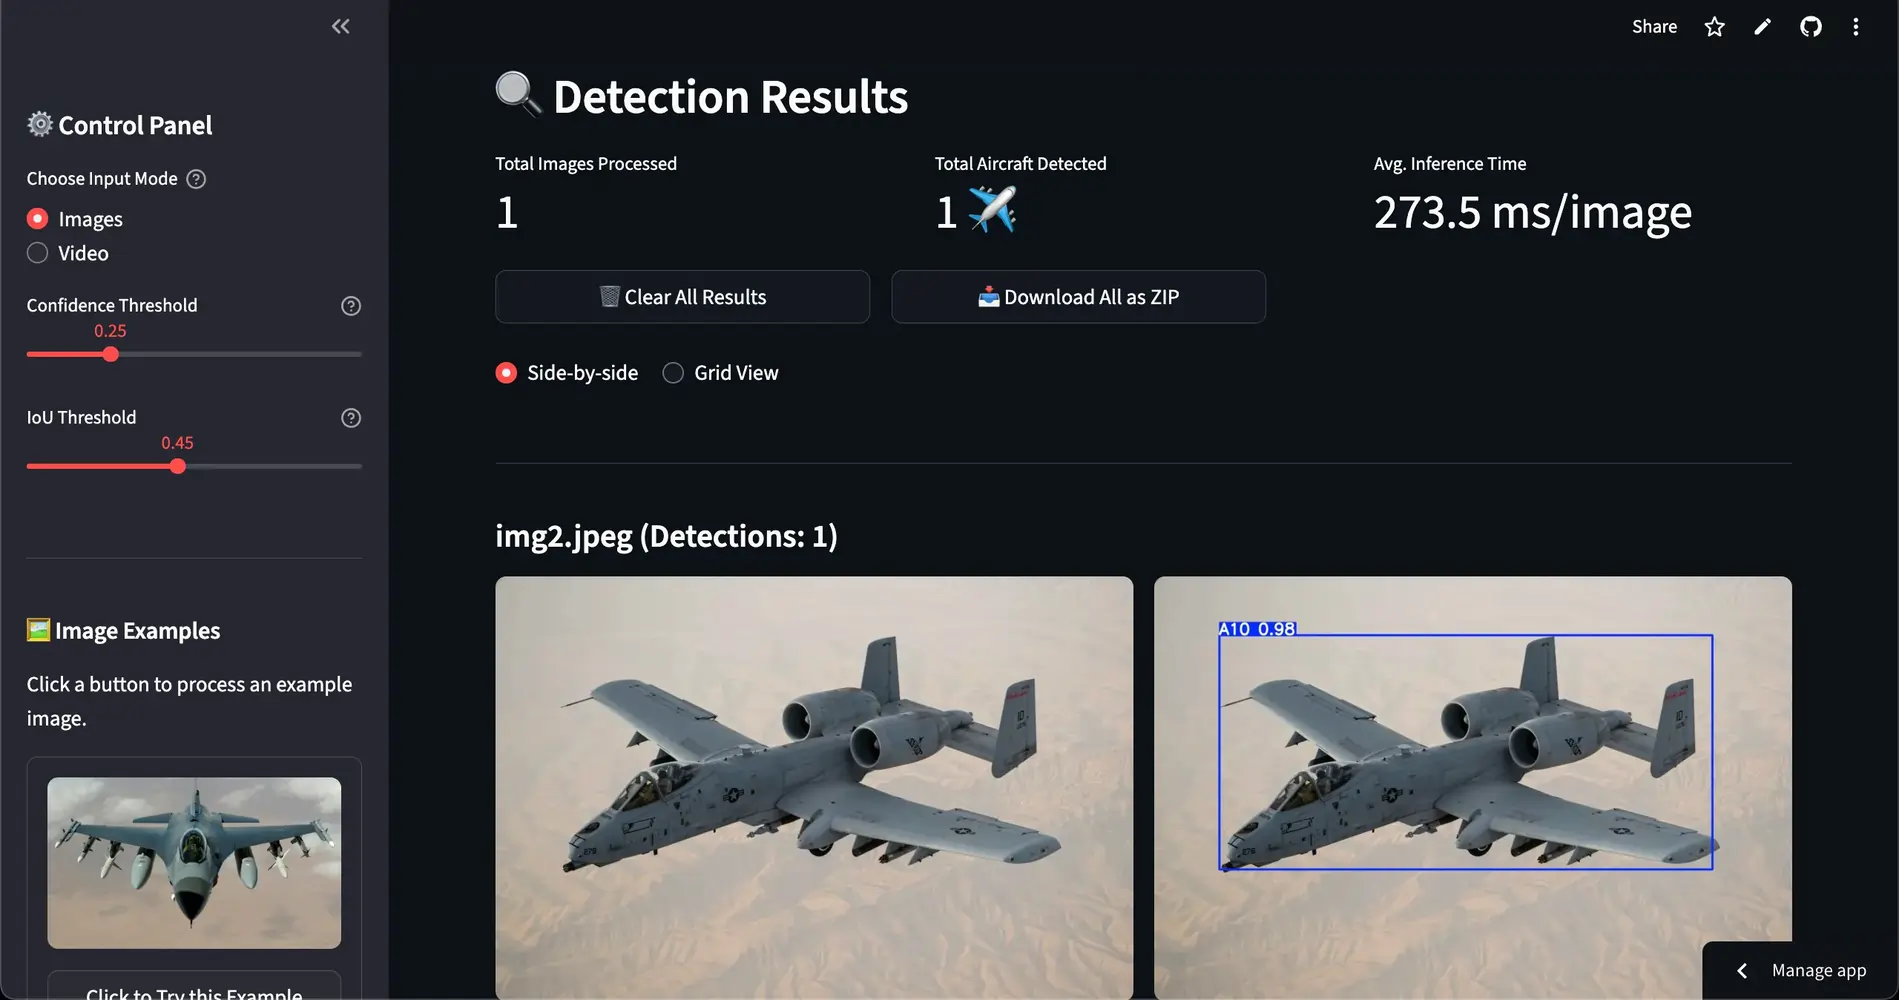
Image Processing Pipeline
The image processing workflow handles multiple formats (JPEG, PNG, BMP, TIFF, WebP) with automatic resizing for large images to prevent memory issues. Each uploaded file undergoes validation before processing, with batch operations supporting simultaneous analysis of multiple images. Results display in two viewing modes - side-by-side comparison and grid view - with downloadable ZIP archives for processed images.
Core Processing Logic
The detection pipeline leverages YOLO’s efficient architecture with optimized preprocessing:
def process_image(model: YOLO, image: Image.Image, confidence: float, iou: float):
    # Resize image to prevent memory issues
    image = resize_image(image, max_size=(1920, 1080))

    # Run detection with custom thresholds
    results = model.predict(source=image, conf=confidence, iou=iou)
    result = results[0]

    # Extract detection count and metrics
    detection_count = len(result.boxes) if result.boxes is not None else 0
    speed_metrics = result.speed

    # Generate annotated image
    processed_array = result.plot()
    processed_image = Image.fromarray(cv2.cvtColor(processed_array, cv2.COLOR_BGR2RGB))

    return processed_image, detection_count, speed_metrics
Video Processing Engine
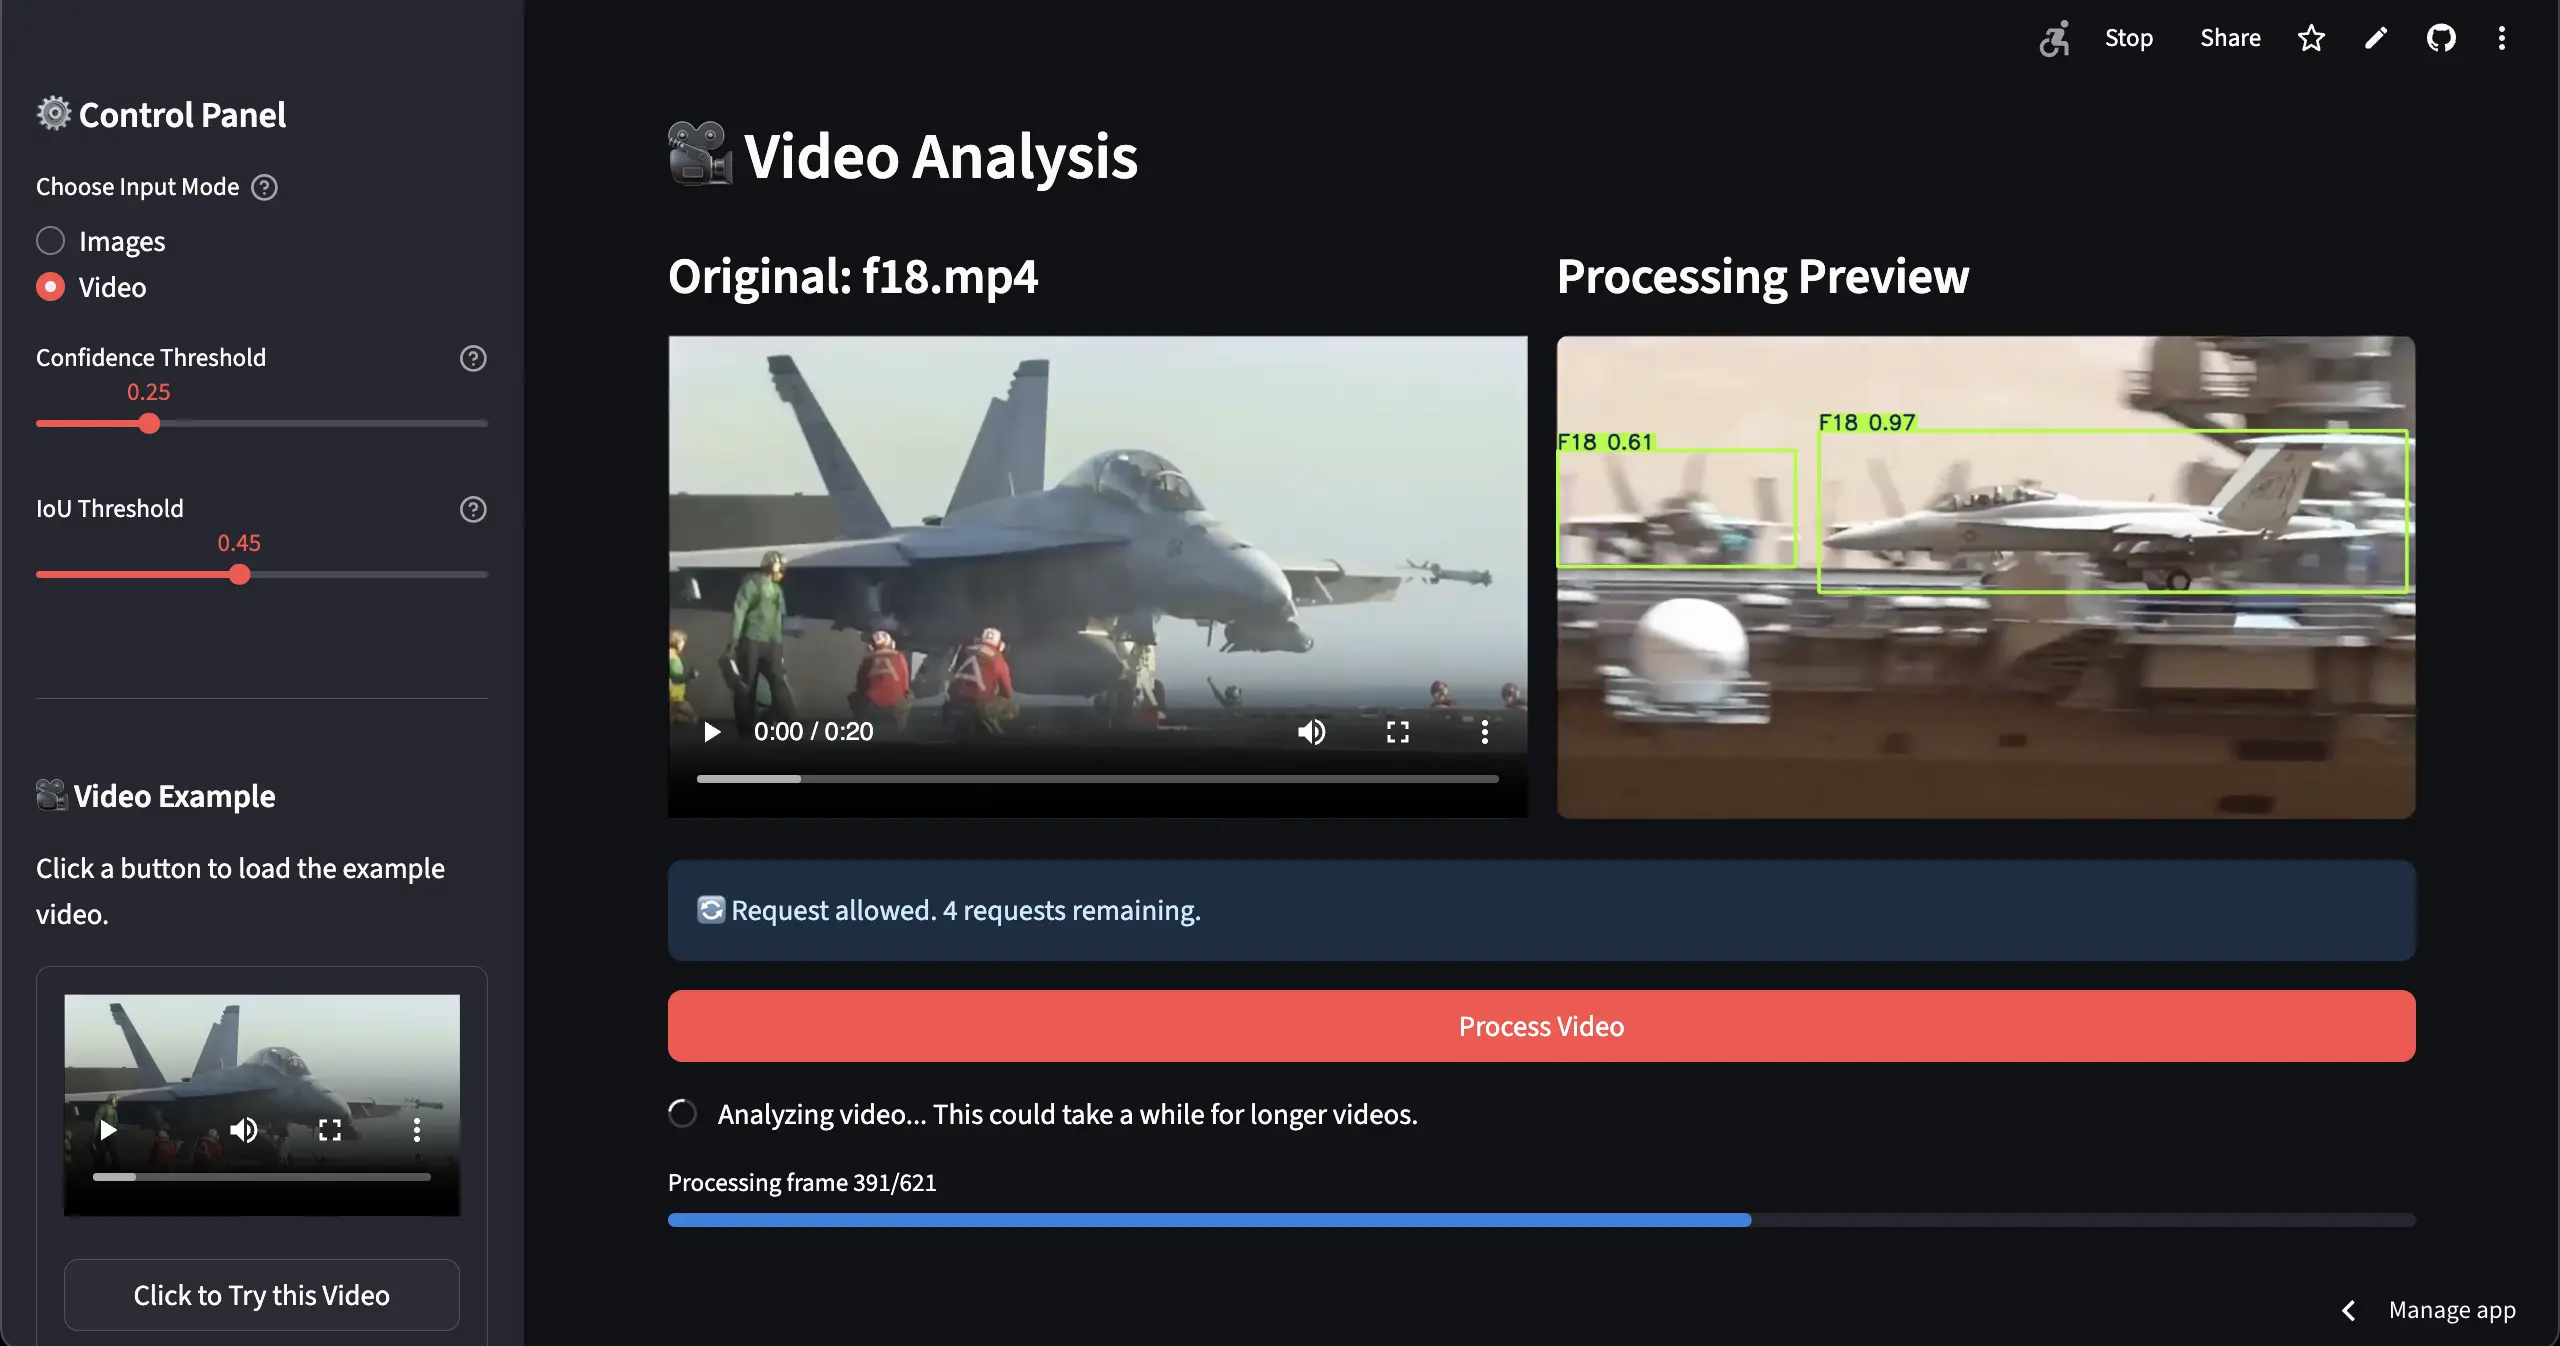
Video analysis supports common formats (MP4, AVI, MOV, MKV, WebM) with a maximum 30-second duration limit for performance optimization. The processing engine uses frame skipping (every 2nd frame) to balance accuracy with speed, while maintaining smooth playback through intelligent frame interpolation. Multiple codec support ensures web compatibility, with fallback options for maximum browser compatibility.
The video processing pipeline implements sophisticated frame-by-frame analysis with optimized memory management:
# Core frame processing logic with intelligent skipping
for frame_idx in range(total_frames):
    ret, frame = cap.read()

    # Process every 2nd frame for efficiency
    if frame_idx % FRAME_SKIP == 0:
        results = model.predict(source=frame, conf=confidence, iou=iou)
        annotated_frame = results[0].plot()
        last_good_frame = annotated_frame.copy()  # Cache for interpolation
        frame_to_write = annotated_frame
    else:
        # Use cached frame for skipped frames
        frame_to_write = last_good_frame if last_good_frame else frame

    output_writer.write(frame_to_write)
This approach ensures consistent frame rates while maintaining detection accuracy through intelligent caching and interpolation between processed frames.
Performance Metrics
The application achieves impressive real-time performance with average inference times of ~200ms per image on standard hardware. Video processing maintains smooth frame rates through intelligent frame skipping (every 2nd frame) while preserving detection accuracy.
Key performance features include:
- Memory Management: Automatic image resizing prevents memory overflow
- Batch Processing: Simultaneous analysis of multiple images
- Progressive Loading: Real-time preview updates during video processing
- Resource Monitoring: CPU and memory usage tracking with health indicators
Security & Rate Limiting
I knew a public-facing app needed to be secure. I implemented security at multiple layers, starting with file validation that uses magic byte verification to ensure a file is actually what it claims to be. I also added rate limiting to prevent spam, restricting users to 10 requests every 5 minutes.
def validate_file_upload(file_bytes: bytes, filename: str, file_type: str):
    # File size validation
    file_size_mb = len(file_bytes) / (1024 * 1024)
    if file_size_mb > MAX_FILE_SIZE_MB:
        return False, f"File too large ({file_size_mb:.1f}MB)"

    # Magic byte validation for images
    if file_type == 'image':
        signatures = {b'\xff\xd8\xff': 'JPEG', b'\x89PNG': 'PNG'}
        if not any(file_bytes.startswith(sig) for sig in signatures):
            return False, "Invalid image signature"

    # Rate limiting check
    if len(client_requests) >= RATE_LIMIT_REQUESTS:
        return False, "Rate limit exceeded"

    return True, sanitize_filename(filename)
User Experience Features
The interface provides contextual examples in the sidebar, with sample images and videos that users can instantly process. Adjustable confidence and IoU thresholds allow fine-tuning of detection sensitivity. Real-time progress indicators, processing previews, and detailed metrics keep users informed throughout the analysis process. The responsive design adapts to different screen sizes while maintaining functionality across all device types.
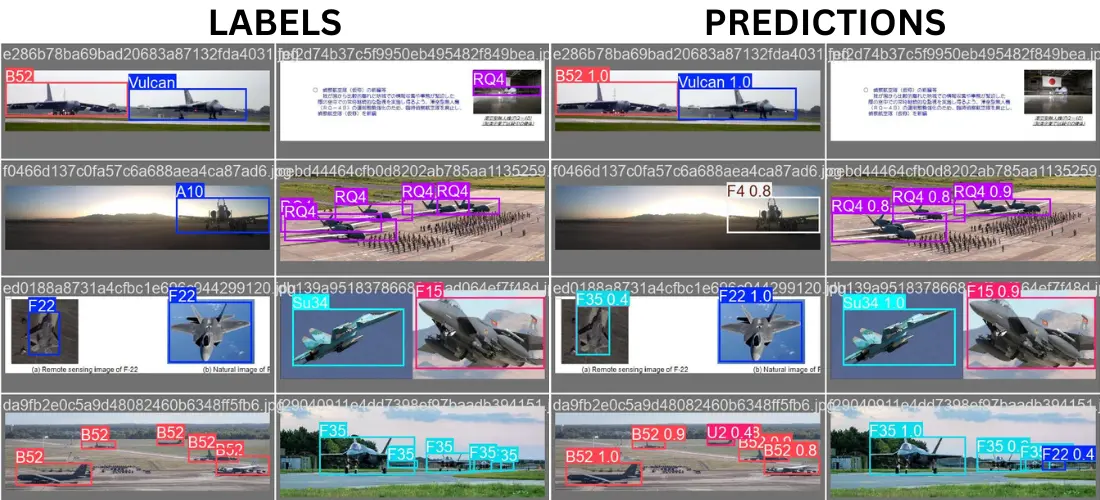
Final Product
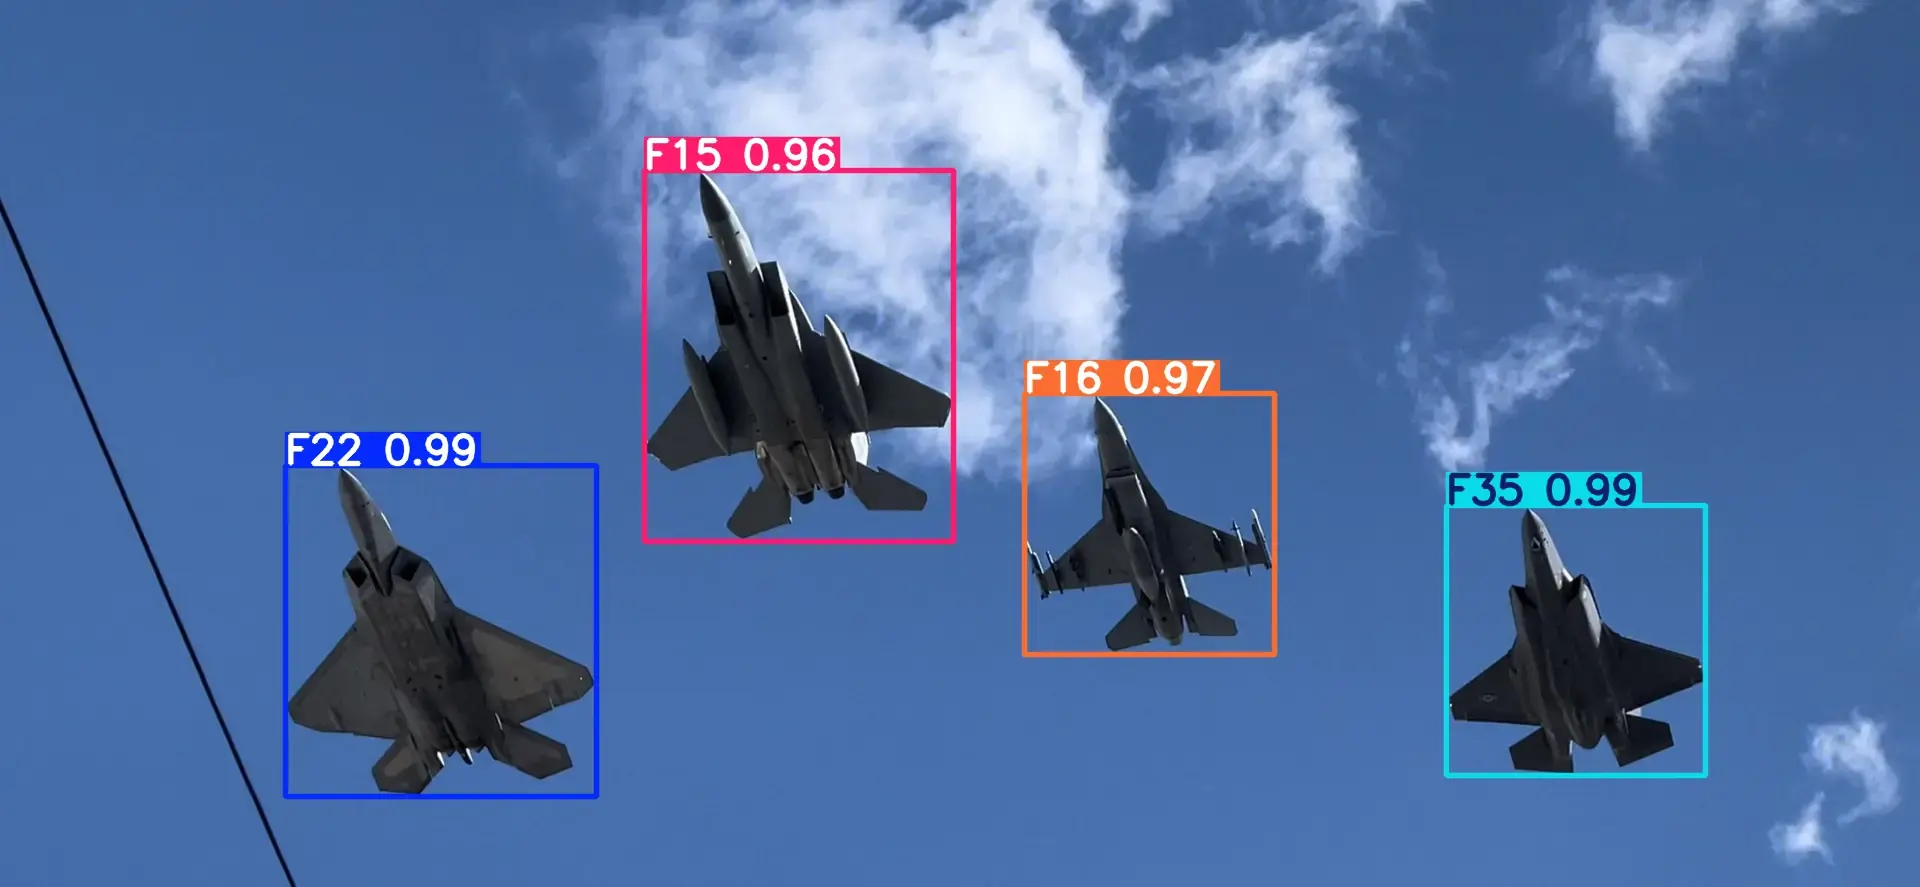
The final result is a complete system that combines the trained YOLOv8 model with an intuitive web interface. It’s a production-ready application that can identify 43 different military aircraft types with solid accuracy. You can use it directly from: https://aircraftdetector.streamlit.app/
Performance Achievements
The trained YOLOv8 model achieved impressive accuracy metrics across training sessions:
Complete Training Progress: Sessions 1 & 2
Final Model Performance:
- mAP50(B): 78.3% - Strong performance in detecting aircraft at moderate IoU threshold
- mAP50-95(B): 72.0% - High precision across stricter IoU thresholds
- Inference Speed: ~200ms per image on standard hardware
- Supported Classes: 43 military aircraft types with balanced detection capabilities
Web Application Features
Here are the key features I built into the Streamlit application:
Core Capabilities:
- Real-time image analysis with adjustable confidence thresholds
- Video processing with frame-by-frame detection overlay
- Batch processing for multiple images simultaneously
- Support for all common formats (JPEG, PNG, MP4, AVI, etc.)
Security & Performance:
- Rate limiting (10 requests per 5-minute window)
- File validation with magic byte verification
- Memory management with automatic image resizing
- Progressive loading with real-time processing previews
User Experience:
- Modern dark theme optimized for extended use
- Side-by-side comparison and grid view modes
- Contextual examples and sample media
- Downloadable results with comprehensive metrics
This project was a great example of bridging the gap between a complex AI model and a practical, usable tool. It demonstrates that with a thoughtful interface and robust backend, even sophisticated AI can be made accessible to a wider audience.
Reflections
The night before starting this project, I was planning my next day. I initially expected to finish the project in 2 days: one for the technical implementation and the other for documentation. But the process did not go as expected at all. It took me 5 full days to complete the training and web application and another two days of part-time work to document and write this article. The lesson is that there is almost always a way to make things better, but that’s not necessarily a good thing.
I had previously heard about Kaggle Notebooks, but I always used Colab in Google’s environment. During training, I realized that using Colab with multiple accounts wouldn’t work. So I decided to try Kaggle Notebooks, which was a great decision. This was the smoothest AI training experience I have ever had. Especially, the Save & Run All feature that lets you run code without having to stay active on Kaggle is amazing.
I also made a couple of mistakes along the way, but each one was an opportunity to learn more:
- I forgot to set the
iterationsparameter while tuning. This possibly cost me better hyperparameter optimization. I should have set the training session in such a way thatiterations x epochs x time per epoch < 12 hoursfor Kaggle. - While doing a training session, I made a mistake with the
data.yamlfile. After this session, the model was mapping detections to the wrong aircraft names. It cost me 9 hours of training. I had to start from scratch. - While training, I set the
workersparameter to a number higher than the available CPU cores. This likely increased the training time. - After running the first training session with 35 epochs, I ran an additional session with the
best_hyperparameters.yamlfrom the tuner. However, since those hyperparameters were tuned for a fresh model, they actually reduced the model’s accuracy. Fortunately, I had set an early stopping mechanism, which halted the process after only 6 epochs.
In short, this project was a great learning opportunity for me. I had the chance to sharpen my technical skills in a new field of technology. The project is completely open-source, and all code, including the scripts for training, is in the Github repo. You can use the app directly from: https://aircraftdetector.streamlit.app/
Future Work & Recommendations
My recommended workflow for a new model:
- Use a dataset like HRPlanesv2 to initially train the model to detect aircrafts generally.
- Train the resulting model on the Military Aircraft Detection dataset to add identification capability. Freeze initial layers.
- Create a PRD and a development plan for the web app. Ensure that you cover all aspects of the app before starting the development process. You are ready to start after this.
During this workflow:
- Set
iterations&epochparameters carefully for the tuner. - Make sure that you select the correct optimizer according to your training method and conditions. I didn’t observe a big difference between SGD and Adam in output.
- Set
workersparameter according to your available CPU cores. - Freeze initial layers when you are performing additional training sessions.
- Use the data.yaml files provided with the datasets to not confuse anything.
- Review your code carefully before using the Save & Run All option.
- Use the tuner function for the first training sessions you run on the datasets. Later, you can stick to the built-in auto-optimizer in the train function or set a low learning rate.
- Develop auto-saver and preserver mechanisms to not lose progress in case something goes wrong. (templates available in github repo)
Most importantly, understand what is going on. Do not just write the scripts and get a working model. Try to see what is behind the code, how it works, why it works. In the developing world of ours, even a simple LLM can write the code to develop this project. The only separator between us is that we are capable of understanding and as a result, we are capable of producing creative outcomes. We must preserve what we have to not lose who we are.